Setting Up a Development Environment With Docker For .NET With Postgres SQL
Setting up the containerized environment for .Net and Postgres SQL in VS Code
Hello, Devs! I am a software developer from Nepal.
In this article, we are going to set up a developer-friendly environment for the asp.net MVC application in visual studio code. In addition, we are going to containerize the MVC application with postgres SQL database along with Pgadmin4. When it comes to development debugging is a crucial task. we also set up debugging functionality to code in the docker container. So, without wasting time let's get started!
What will we learn from this article?
This article guide teaches you how to set up containerized .NET application using docker and how to use it in a developer environment with the debugger.
Create a simple dot net MVC application
Create a new Dockerfile which contains instructions required to build a. Net image.
Set up docker-compose which set up postgres sql database, pgadmin to monitor postgres database.
Set up vs code debugger in the visual studio code editor.
Docker
Docker is a software platform that enables rapid development, testing, and deployment of applications. Docker encapsulates software into standardized units called containers that have everything (i.e all dependencies) the software needs to run including libraries, system tools, code, runtime, and settings.
Container
A container is a standard unit of software that packages up code and all its dependencies to that application and runs quickly and reliably from one computing environment to another. We can think container as an isolated process in the operating system which has its own networking and file system. A Docker Container image is a lightweight, standalone, executable package of software that includes everything needed to run an application: code, runtime, system tools, system libraries, and settings.
DotNet
.NET is an open-source developer platform, created by Microsoft, for building many different types of applications. .Net is a free, cross-platform, open-source developer platform for building different types of applications.
With .NET, you can use multiple languages, editors, and libraries to build for web, mobile, desktop, games, IoT, and more. You can write .NET apps in C#, F#, and many other dot net languages.
Software Prerequistes
Before diving into the coding section, we have to make sure the following software is installed. I am using windows 11 for this guide. You can use other operating systems as well.
Docker Desktop with docker-compose
Visual Studio Code
Dotnet Sdk 7
Any Web Browser
Creating New .NET MVC Application
For our sample application, let's create a simple application from a template using .NET CLI. Create a directory in our local machine named sampleapp. Open a cmd and change to that directory. Run the following dotnet new command to create a C# app using the ASP.NET MVC template.
mkdir sampleapp
cd sampleapp
dotnet new mvc -n sampleapp -o src --no-https
Above command will create an src file inside sampleapp folder. Furthermore, inside src, we will get asp.net MVC project folders and files. The further structure will look like following
├── src
├── Controllers
│ └── HomeController.cs
├── Models
│ └── ErrorViewModel.cs
├── Views
│ └── Home
│     └── Index.cshtml
│     └── Privacy.cshtml
├── Program.cs
├── Properties
│ └── launchSettings.json
├── appsettings.Development.json
├── appsettings.json
├── sampleapp.csproj
├── obj
│ ├── sampleapp.csproj.nuget.dgspec.json
│ ├── sampleapp.csproj.nuget.g.props
│ ├── sampleapp.csproj.nuget.g.targets
│ ├── project.assets.json
│ └── project.nuget.cache
└── wwwroot
  ├── css
  ├── favicon.ico
  ├── js
  └── lib
Now, Let's start our application and make sure it's running properly. In the command prompt navigate to the src folder and use the dotnet run command.
cd /path/to/sampleapp/src
dotnet run --urls http://localhost:5000
Ouput similar to the following appears.
Building...
info: Microsoft.Hosting.Lifetime[0]
    Now listening on: http://localhost:5000
info: Microsoft.Hosting.Lifetime[0]
    Application started. Press Ctrl+C to shut down.
info: Microsoft.Hosting.Lifetime[0]
    Hosting environment: Development
info: Microsoft.Hosting.Lifetime[0]
    Content root path: C:\Users\username\sampleapp\src
Now you will see the following page in the browser:

If you get the result as the above image then you will install mvc project correctly and you
are ready to go further.
Create a Dockerfile
In sampleapp directory, create a file named Dockerfile And paste the following code.
FROM mcr.microsoft.com/dotnet/sdk:7.0 as debug

#install debugger for NET Core
RUN apt-get update
RUN apt-get install -y unzip
RUN curl -sSL https://aka.ms/getvsdbgsh | /bin/sh /dev/stdin -v latest -l ~/vsdbg

RUN mkdir /src/
WORKDIR /src/

COPY ./src/testapp.csproj /src/sampleapp.csproj
RUN dotnet restore

COPY ./src/ /src/
RUN mkdir /out/
RUN dotnet publish --no-restore --output /out/ --configuration Release
EXPOSE 80
CMD dotnet run --urls "http://0.0.0.0:80"
The above Dockerfiel is used for building and running a .NET Core application in a Docker Container.
It starts with the base image mcr.microsoft.com/dotnet/sdk:7.0 and tags it as debug.
In summary above docker file will do the following tasks step by step one at a time.
Installs the debugger for .NET Core by updating the package list and installing unzip, then downloading and installing the latest version of vsdbg.
Creates a directory '/src/' as the working directory.
Copies the project file 'sampleapp.csproj' to '/src/' and restores the dependencies.
Copies the source code to '/src/' and runs the publish command to build and output the application to '/out/'.
Exposes port 80 for external access.
Runs the application with the command
dotnet run --urls "http://0.0.0.0:80".
Create docker-compose.yml File
Docker Compose is a tool for defining and running multi-container Docker applications. It allows you to define an application’s services, networks, and volumes in a single file, then start and stop the services using a single command.
Open the sampeapp directory in vs code and create a file named docker-compose.yml . Copy and paste the following contents into the file.
version: "3.0"
services:
  db:
    image: postgres
    restart: always
    ports:
      - "5432"
    volumes:
      - postgres:/var/lib/postgresql/data
    environment:
      POSTGRES_PASSWORD: password
      POSTGRES_USER: sachin

  pg_admin:
    image: dpage/pgadmin4
    restart: always
    ports:
      - "5555:80"
    volumes:
      - pg_admin:/var/lib/pgadmin
    environment:
      PGADMIN_DEFAULT_EMAIL: sachin.maharjan@dishhome.com.np
      PGADMIN_DEFAULT_PASSWORD: password

  web:
    container_name: csharp
    build:
      context: .
      target: debug
    ports:
     - "5000:80"
    volumes:
      - ./src:/src/
    depends_on:
     - db

volumes:
  postgres:
  pg_admin:
Save and close the docker-compose.yml file. Add the .dockerignore file and paste the following code.
**/bin/
**/obj/
The sampleapp directory structure should now look like
├── samplefile
│ ├── src/
│ ├── Dockerfile
│ ├── .dockerignore
│ ├── docker-compose.yml
The .dockerignore the file is used in a Docker build context to specify files or directories that should be excluded from the build context. This helps to reduce the size of the build context and improve the build time by excluding files and directories that are not necessary for the build. Any files or directories listed in the .dockerignore file will not be included in the build context that is sent to the Docker daemon for building the image.
The docker-compose.yml the file describes a multi-container application. In our docker-compose.yml file, we have three services db, pgadmin and web.
'db' is a PostgreSQL database service, which uses the official PostgreSQL image. It will be exposed on port 5432 and the data will be persisted in a Docker volume named 'postgres'. The environment variables 'POSTGRES_PASSWORD' and 'POSTGRES_USER' are set to 'password' and 'sachin' respectively.
'pg_admin' is a web-based database administration tool, using the image 'dpage/pgadmin4'. It will be exposed on port 5555 and the data will be persisted in a Docker volume named 'pg_admin'. The environment variables 'PGADMIN_DEFAULT_EMAIL' and 'PGADMIN_DEFAULT_PASSWORD' are set to 'sachin.maharjan@dishhome.com.np' and 'password' respectively.
'web' is a .NET Core web application service. The service is built from the current directory and the build context is set to the 'debug' target. The service will be exposed on port 5000 and the source code will be mounted as a volume in the container at the '/src/' directory. The 'depends_on' key ensures that the 'db' service is started before the 'web' service.
The 'volumes' section at the bottom defines two named volumes: 'postgres' and 'pg_admin'.
Database Connection
Let's add the package to allow the app to talk to a database and update the source files. On your local machine, open a terminal, change the directory to the src directory and run the following command:
cd /path/to/dotnet-docker/src
dotnet add package Npgsql.EntityFrameworkCore.PostgreSQL
In the src directory, create a Models folder. Inside the Models folder create a file named Student.cs and add the following code to Student.cs:
using System;
using System.Collections.Generic;
namespace sampleapp.Models
{
  public class Student
  {
    public int ID { get; set; }
    public string LastName { get; set; }
    public string FirstMidName { get; set; }
    public DateTime EnrollmentDate { get; set; }
  }
}
Save and close the Student.cs file.
In the src directory, create a Data folder. Inside the Data folder create a file named SchoolContext.cs and add the following code to SchoolContext.cs:
using Microsoft.EntityFrameworkCore;
namespace sampleapp.Data
{
   public class SchoolContext : DbContext
   {
      public SchoolContext(DbContextOptions<SchoolContext> options) : base(options) { }
      public DbSet<Models.Student>? Students { get; set; }
   }
}
Save and close the SchoolContext.cs file.
In the Program.cs file located in the src directory, replace the contents with the following code:
using Microsoft.EntityFrameworkCore;
using sampleapp.Data;

var builder = WebApplication.CreateBuilder(args);

// Add services to the container.
builder.Services.AddControllersWithViews();
builder.Services.AddDbContext<ApplicationDbContext>(options =>
   options.UseNpgsql(builder.Configuration.GetConnectionString("DefaultConnection")));
var app = builder.Build();

// Configure the HTTP request pipeline.
if (!app.Environment.IsDevelopment())
{
    app.UseExceptionHandler("/Home/Error");
}
app.UseStaticFiles();
app.UseRouting();
app.UseAuthorization();
app.MapControllerRoute(
    name: "default",
    pattern: "{controller=Home}/{action=Index}/{id?}");

using (var scope = app.Services.CreateScope())
{
    var services = scope.ServiceProvider;

    var context = services.GetRequiredService<ApplicationDbContext>();
    if (context.Database.GetPendingMigrations().Any())
    {
        context.Database.Migrate();
    }
}
app.Run();
Save and close the Program.cs file.
In the appsettings.json file located in the src directory, replace the contents with the following code:
{
   "Logging": {
       "LogLevel": {
           "Default": "Information",
           "Microsoft": "Warning",
           "Microsoft.Hosting.Lifetime": "Information"
       }
   },
   "AllowedHosts": "*",
   "ConnectionStrings": {
       "SchoolContext": "Host=db;Database=my_db;Username=sachin;Password=password"
   }
}
Save and close the appsettings.json file.
In the Index.cshtml file located in the src\Pages directory, replace the contents with the following code:
@{
    ViewData["Title"] = "Home page";
}

<div class="text-center">
    <h1 class="display-4">Welcome</h1>
    <p>Learn about <a href="https://docs.microsoft.com/aspnet/core">building Web apps with ASP.NET Core</a>.</p>
</div>

<div class="row mb-auto">
    <p>Student Name is @ViewBag.Student</p>
</div>
Save and close the Index.cshtml file.
In the Index.cshtml.cs file located in the src\Pages directory, replace the contents with the following code:
using System.Diagnostics;
using Microsoft.AspNetCore.Mvc;
using sampleapp.Models;

namespace testapp.Controllers;

public class HomeController : Controller
{
    private readonly ILogger<HomeController> _logger;
    private readonly SchoolDbContext _db;
    public HomeController(ILogger<HomeController> logger, SchoolDbContext db)
    {
        _logger = logger;
        _db = db;
    }

    public IActionResult Index()
    {
        var student = _context.Students?.Where(d=>d.ID==1).FirstOrDefault();
            this.StudentName = $"{s?.FirstMidName} {s?.LastName}";
       ViewBag.Student = student;
        return View();
    }

    public IActionResult Privacy()
    {
        return View();
    }

    [ResponseCache(Duration = 0, Location = ResponseCacheLocation.None, NoStore = true)]
    public IActionResult Error()
    {
        return View(new ErrorViewModel { RequestId = Activity.Current?.Id ?? HttpContext.TraceIdentifier });
    }
}
Save and close the Index.cshtml.cs file.
Now, add migration command to create database and students table in a database named my_db.
dotnet-ef migrations add "InitalMigration"
Note: you need to install dotnet-ef utility tool, for this you can install this using
donet tools install --global dotnet-ef
Now, up the all container using docker-compose up command. cd to sampleapp directory and run the following command.
cd path to sampleapp
docker-compose up --build
If every thing is ok then all three containers web, database and pgadmin will start. Now, go to browser and enter url localhost:5555. you will see the login page of pg admin.
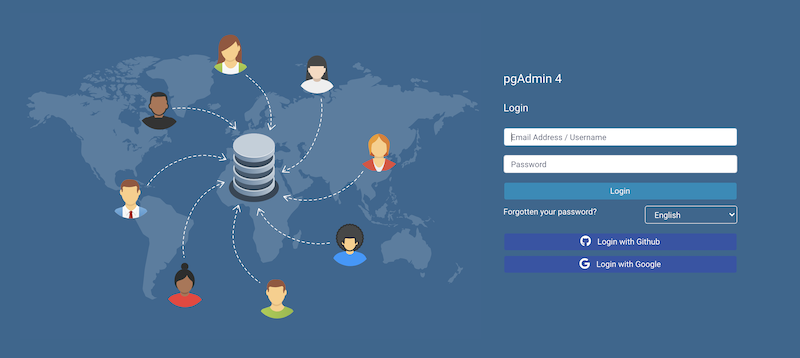
Now, Login into pgadmin using email and password setup in docker-compose.yml file. After that, you will redirect to the home page.
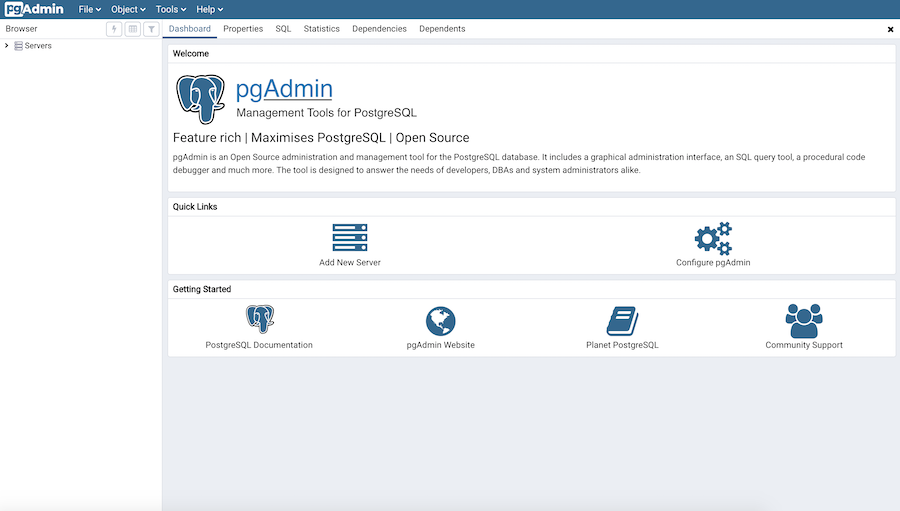
Now right-click on the server and click on to register server option. Then a dialog box will open. In that section, you have to provide the hostname as db port name 5432 and username as sachin and password as password. All credentials are already defined in docker-compose.yml the file.
Now, Open the server menu you will see the database name my_db. Now open that my_db menu you will see the schema section. Under the schema section, you will see tables. Now add a row in the table named students.
so, If you open a browser and enter localhost:5000 you will see the home page with the first name and last name that you have inserted in the database.
Enabling Debugging In VS Code
For enabling debugging in vs code, first, we need the following extensions in vs code
VS Code Extension for Docker
VS Code Launch configuration
C# extension for VS Code
Click on to debug button on the right of the visual studio code. Then You will have the option to create a launch.json file. Click on it to create a launch.json.
Then it will create .vscode under sampleapp directory. when we open .vscode directory we will see the launch.json file. Open the file and paste the code below:
{
    // Use IntelliSense to learn about possible attributes.
    // Hover to view descriptions of existing attributes.
    // For more information, visit: https://go.microsoft.com/fwlink/?linkid=830387
    "version": "0.2.0",
    "configurations": [
        {
            "name": ".NET Core Docker Attach",
            "type": "coreclr",
            "request": "attach",
            "processId": "${command:pickRemoteProcess}",
            "pipeTransport": {
                "pipeProgram": "docker",
                "pipeArgs": [ "exec", "-i", "csharp" ],
                "debuggerPath": "/root/vsdbg/vsdbg",
                "pipeCwd": "${workspaceRoot}",
                "quoteArgs": false
            },
            "sourceFileMap": {
                "/src": "${workspaceRoot}/src/"
            }
        },

    ]
}
Now, if you put breakpoints in any c# code and hit the green run button on debug section. Then execution stops at that breakpoint. But you have to choose the correct process during the prompt which pops out while you click the green run button.

The above animation is for node.js, I have kept it just to simulate how it is done.
That is, it! I hope you found this helpful. If you have any questions or are confused about anything, you can reach out to me or you can check out the sample project on GitHub.
Thank you!
Happy Coding :)