Containerizing Dotnet Web Application
The .NET application was containerized using Docker to ensure consistency across development and production environments.
A Dockerfile was created at the root of the project directory. This Dockerfile defined a multi-stage build, where the application was built and run in a minimal environment. The build stage involved using the .NET SDK to restore dependencies and publish the application, while the runtime stage used the ASP.NET Core image to run the application.
An example of the Dockerfile is shown below:
# Build stage
FROM mcr.microsoft.com/dotnet/sdk:7.0 AS build-env
WORKDIR /app

# Copy project files and restore dependencies
COPY *.csproj ./
RUN dotnet restore

# Copy remaining application files and build
COPY . ./
RUN dotnet publish -c Release -o out

# Runtime stage
FROM mcr.microsoft.com/dotnet/aspnet:7.0
WORKDIR /app
COPY --from=build-env /app/out .

# Expose port 80 and run the application
EXPOSE 80
ENTRYPOINT ["dotnet", "MyDotnetApp.dll"]
The image was then built using Docker with the following command:
bashCopy codedocker build -t <MyRegistryURL>:<Port>:latest .
This command created a Docker image tagged as my-dotnet-app:latest, ready to be pushed to a registry.
Setting Up a Private Docker Registry
A private Docker registry was set up to store and manage Docker images, enabling secure access across different servers. Docker’s official Registry 2 image was used to achieve this.
The registry was started with the following command:
bashCopy codedocker run -d -p 5000:5000 --name registry --restart=always registry:2
This command deployed a registry container that listens on port 5000. The --restart=always flag ensured that the registry would restart automatically in case of server restarts or failures.
Afterward, the Docker image created earlier was tagged for the private registry and pushed:
# Tagging the image
docker tag my-dotnet-app:latest localhost:5000/my-dotnet-app:latest

# Pushing the image to the private registry
docker push localhost:5000/my-dotnet-app:latest
The image was successfully stored in the private registry, making it accessible to other servers in the Docker Swarm cluster.
Configuring a Docker Swarm Cluster
A Docker Swarm cluster configuration is essential for deploying the application across multiple servers. Docker Swarm simplifies the orchestration and management of containerized applications by enabling clustering, load balancing, and service discovery.
Step 1: Initialize Docker Swarm
First, one of the servers was chosen as the Swarm Manager, who was responsible for managing the entire cluster. The Swarm was initialized using the following command:
docker swarm init --advertise-addr <manager-ip>
--advertise-addr specifies the IP address of the manager node so that other nodes can discover and join the swarm.
After running this command, Docker outputs a unique token, which is used to add worker nodes to the swarm.
Step 2: Add Worker Nodes to the Swarm
The remaining two servers were designated as Worker Nodes, which will host the application containers. To join these worker nodes to the swarm, the token from the previous step was used:
docker swarm join --token <swarm-join-token> <manager-ip>:2377
This command connects the worker nodes to the swarm, allowing them to be managed by the Swarm Manager.
To confirm that the nodes had successfully joined the swarm, the following command was run on the manager node:
Copy codedocker node ls
This command lists all the nodes in the swarm and shows their status. The manager node is marked as the leader, and the worker nodes are shown as active members of the swarm.
Installing Git
You can use sudo apt install git it in Debian servers.
Installing Gitlab Task Runner
To run GitLab CI pipelines, GitLab Runner must be installed. GitLab Runner is an application used to run jobs in the GitLab CI/CD pipeline.
Add the GitLab Runner Repository
Add the official GitLab Runner repository to your system:
curl -L https://packages.gitlab.com/install/repositories/runner/gitlab-runner/script.deb.sh | sudo bash
Install GitLab Runner
After downloading the binary, you need to install the GitLab Runner using the following command:
sudo apt install gitlab-runner
Verify that GitLab Runner has been installed successfully by checking its version:
gitlab-runner --version
Step 3: Register GitLab Runner
To make GitLab Runner work with GitLab CI pipelines, it needs to be registered with the GitLab instance.
Get the GitLab Runner Token
Go to your GitLab project and navigate to:
Settings > CI / CD > Runners.
Here, you’ll find the registration token, which is needed to register the runner.

Register the Runner
Run the following command to register the GitLab Runner:
sudo gitlab-runner register
The system will ask for the following details:
GitLab instance URL: e.g., https://gitlab.example.com/
Registration token: The token from your GitLab project
Description: Name for your runner
Tags: Optional tags to identify the runner
Executor: Choose the executor to run your jobs (e.g., shell, docker, etc.).
Start GitLab Runner
After registration, the runner service can be started with:
sudo gitlab-runner start
Setting Up CI/CD Pipeline for Dockerized .NET Applications using GitLab CI
In modern software development, automating the build, test, and deployment process is crucial for efficiency and reliability. GitLab CI/CD provides a robust pipeline setup for automating these tasks. In this step, a Continuous Integration (CI) and Continuous Deployment (CD) pipeline is described for Dockerized .NET applications using GitLab CI. The setup will build and push Docker images to a private registry, then deploy them using Docker Swarm.
Pipeline Configuration Overview
The .gitlab-ci.yml file is the main configuration file used by GitLab CI to define the pipeline stages and scripts to execute. Below is an explanation of the pipeline defined for a Dockerized .NET project.
 image: docker:latest

 stages:
   - build
   - deploy

 variables:
   REGISTRY_URL: "<your Registry URL>"
   IMAGE_TAG: "<latest image tag>"
Docker Image: The pipeline uses the docker:latest image, which includes Docker CLI tools for building, pushing, and managing containers.
Stages: Two stages are defined—build and deploy.
Variables: The REGISTRY_URL specifies the location of the private Docker registry, and IMAGE_TAG defines the version of the images being built and deployed.
Build Stage
The build stage involves compiling the Docker images for two services, the API Gateway and the IVR Service, and pushing them to the private registry.
    build:
      stage: build
      script:
        - docker build -t $REGISTRY_URL/dmn/apigateway:$IMAGE_TAG  APIGateway/DMNMiddleware.APIGateway
        - docker push $REGISTRY_URL/dmn/apigateway:$IMAGE_TAG

        - docker build -t $REGISTRY_URL/dmn/ivrservice:$IMAGE_TAG IVRService/DMNMiddleware.IVRService/
        - docker push $REGISTRY_URL/dmn/ivrservice:$IMAGE_TAG
      tags:
        - dmnmiddleware
      only:
        - master
Docker Build: Two Docker images are built—one for the API Gateway (APIGateway/DMNMiddleware.APIGateway) and another for the IVR Service (IVRService/DMNMiddleware.IVRService).
- The
docker build command is used to create the image, tagged with the registry URL and the image version.
Docker Push: After building the images, they are pushed to the private Docker registry at 192.168.48.107:5000.
- The
docker push command uploads the images to the specified registry.
Tags: The runner is configured to use dmnmiddleware as a tag, ensuring that only appropriate runners will execute the job.
Branch Limitation: This step is set to run only on the master branch to avoid deploying from other branches.
Deploy Stage
The deploy stage involves deploying the services using Docker Swarm by using a pre-configured docker-stack.yml file.
    deploy:
      stage: deploy
      script:
        - echo "Deploying DMN Middleware ..."
        - docker stack rm dmn_middleware
        - sleep 10
        - docker stack deploy -c docker-stack.yml dmn_middleware
      tags:
        - dmnmiddleware
      needs:
        - build
      only:
        - master
Deployment Script:
Docker Stack Removal: The docker stack rm the command removes the existing stack named dmn_middleware to ensure that old services are stopped and replaced by the new deployment.
Delay: A 10-second delay (sleep 10) is introduced to give Docker time to clean up the previous deployment before redeploying.
Docker Stack Deployment: The docker stack deploy command is used to deploy the updated images to the Docker Swarm cluster using the docker-stack.yml configuration file.
Example docker-stack.yml File
Following is just an sample example of docker-stack yml file.
  version: '3.8'

  services:
    apigateway:
      image: 192.168.48.107:5000/dmn/apigateway:1.0.0
      deploy:
        replicas: 2
        restart_policy:
          condition: on-failure
      ports:
        - "8080:80"
      networks:
        - dmn_network

    ivrservice:
      image: 192.168.48.107:5000/dmn/ivrservice:1.0.0
      deploy:
        replicas: 2
        restart_policy:
          condition: on-failure
      ports:
        - "8081:80"
      networks:
        - dmn_network

  networks:
    dmn_network:
      driver: overlay

  volumes:
    data:
Explanation of the docker-stack.yml File
Version: Specifies the version of the Docker Compose file format. 3.8 is used in this example, compatible with Docker Swarm.
Services: Defines the different services in the stack.
apigateway:
image: Specifies the Docker image for the API Gateway. The image is pulled from the private Docker registry at 192.168.48.107:5000 with the tag 1.0.0.
deploy: Configures deployment settings:
ports: Maps port 80 in the container to port 8080 on the host, allowing external access.
networks: Connects the service to the dmn_network.
ivrservice:
image: Specifies the Docker image for the IVR Service, similarly pulled from the private Docker registry.
deploy: Configures deployment settings, including replicas and restart_policy.
ports: Maps port 80 in the container to port 8081 on the host.
networks: Connects the service to the dmn_network.
Networks:
- dmn_network: Defines an overlay network that allows services to communicate with each other within the Docker Swarm cluster.
Volumes:
- data: Declares a volume named
data, which can be used for persisting data across container restarts. It is not used in this example but is included to show how volumes are defined.
Dependency on Build Stage: The deploy job is dependent on the successful completion of the build job using the needs: - build directive, ensuring that only freshly built images are deployed.
Tags and Branch Restriction: Similar to the build stage, the deploy stage runs only on runners tagged with dmnmiddleware and only on the master branch.
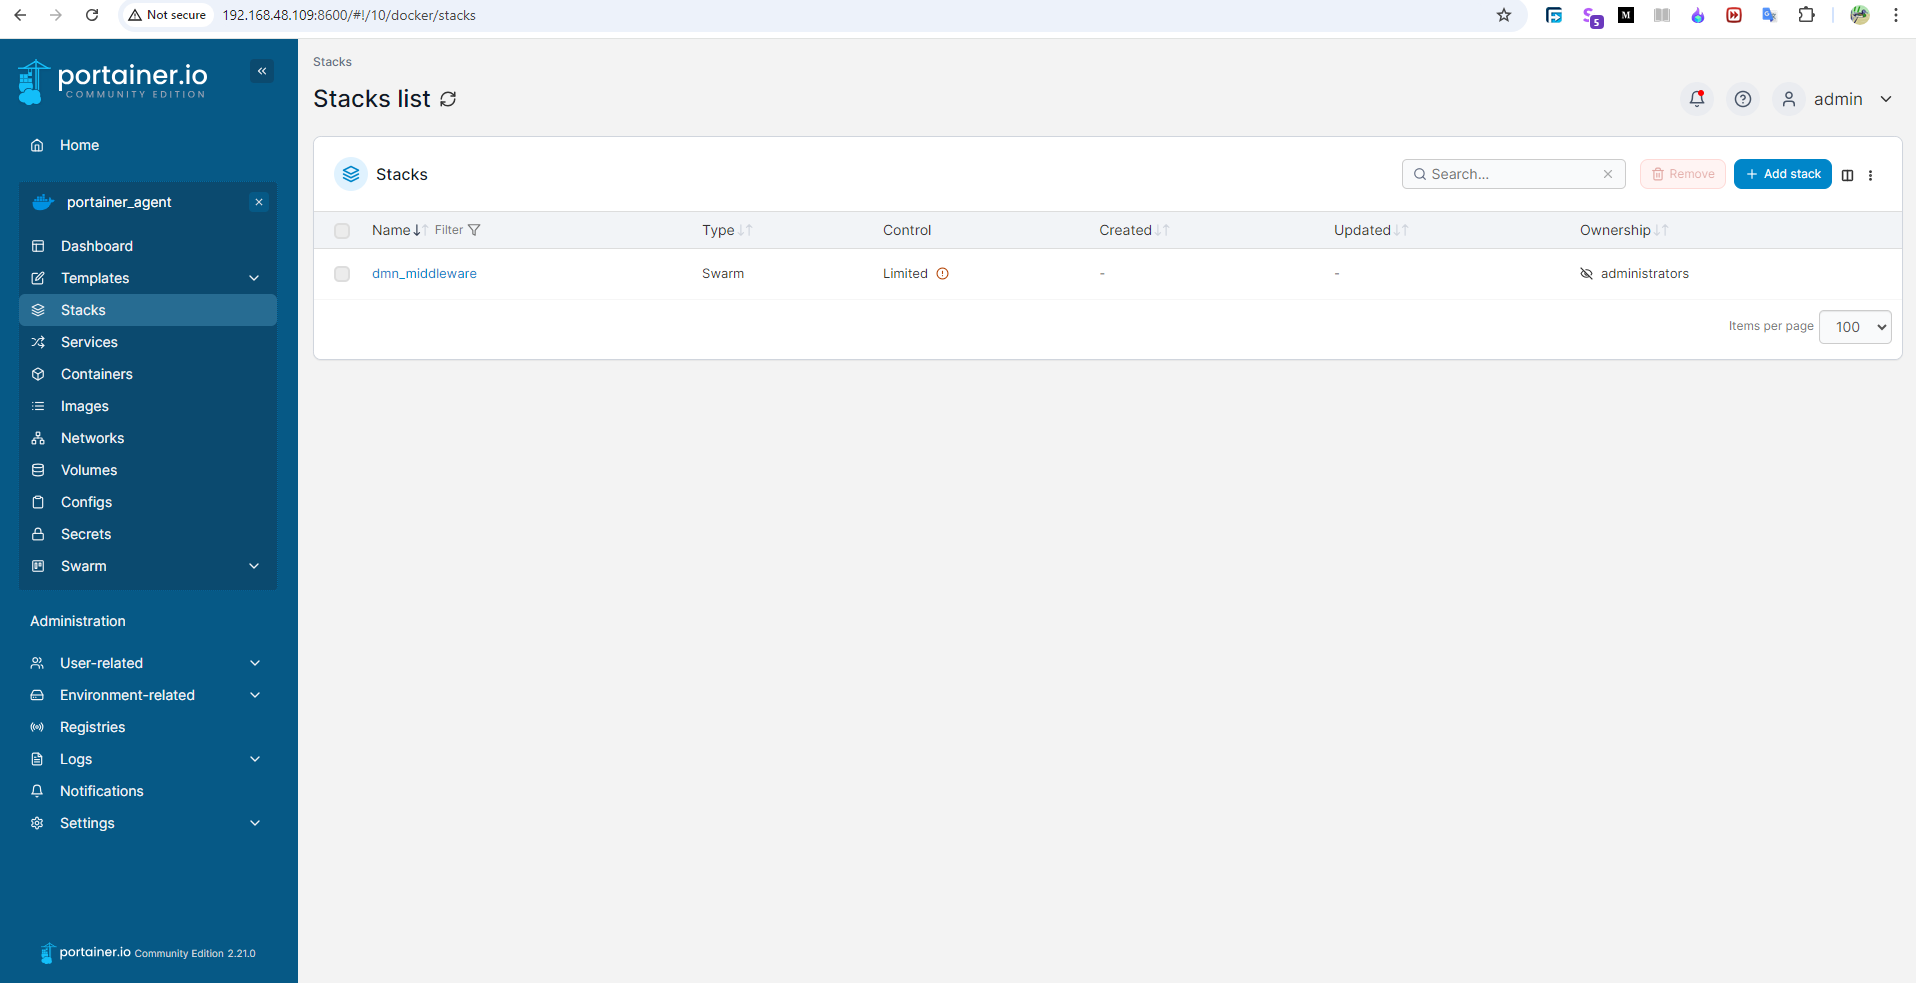
Monitoring Using Portainer
Portainer is a lightweight management UI that simplifies container management for Docker environments. It provides an intuitive web interface for managing Docker containers, images, volumes, networks, and more. Portainer supports Docker Swarm and Kubernetes, making it versatile for both single-host and multi-host setups. Its user-friendly dashboard helps streamline container operations and monitoring, improving overall efficiency.
I don't talk here about how to install portainer because it is quite simple. You can follow the official documentation of portainer for quick up and running. After successful completion of the CI-CD job you can see your stack in portainer.
Thank you for reading my blog.
Have a nice day and Happy Coding :)